Pro Tools Integration with DANTE

DANTE virtual sound card

If there is already a Dante network in place then it’s easy to multi-track record and playback up to 64 channels with Pro tools or any other DAW. This can be accomplished with Dante Virtual Sound Card which will turn your computer (DAW) into a Date networked device using your existing Ethernet port. The software requires a license purchase but it is well worth it in my opinion.  

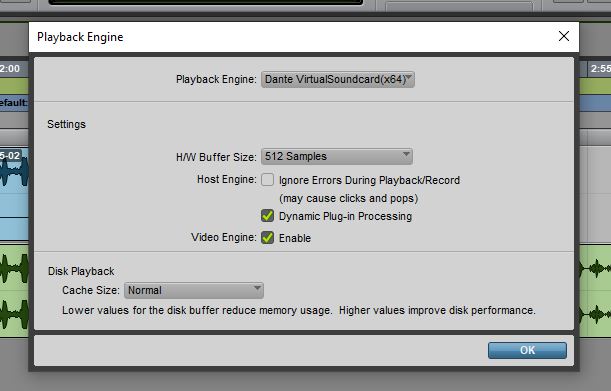
Select DANTE as your playback engine

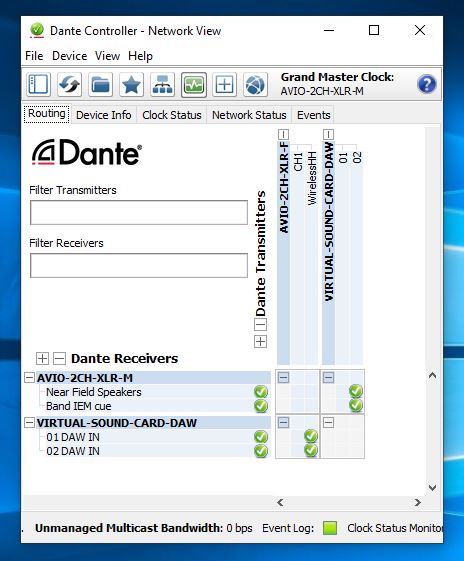
With the software running we can select it as our audio interface in Pro Tools under Hardware Configuration.  The routing for the virtual sound card is handled by Audinate’s Dante Controller Software which is free. It can be used to control the audio routes and matrix of any Dante network. Use it to route audio in and out of your DAW from other devices on the network.

DANTE Controller for audio routing

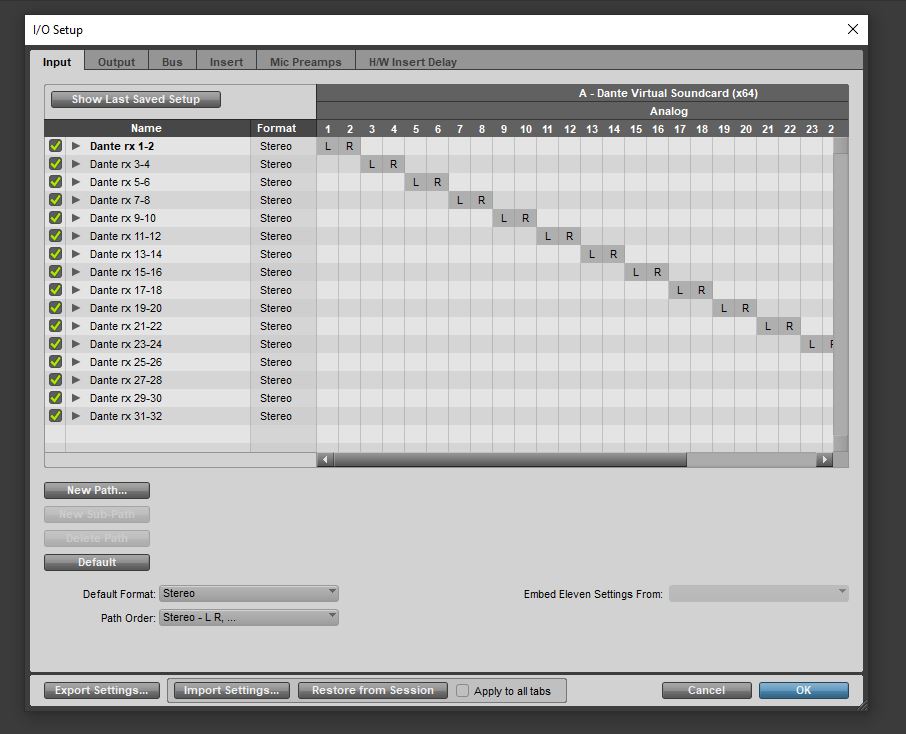
In ProTools set your track inputs to the Dante sources just as with any other audio interface. Also double check your ProTools Hardware IO settings which are different than Dante Controller IO settings. Selecting the default IO setup is adequate for most situations.  You should now be able to record and playback respectably the active channels on the Dante network in and out of ProTools.

I/O routing of DANTE channels to your DAW

Connect Pro Tool to your DANTE network with the steps:

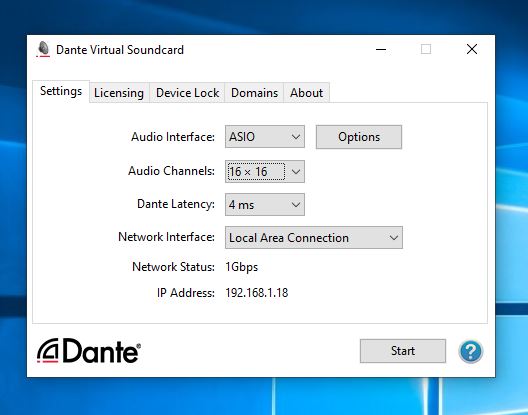
-Download, open and configure Dante Virtual Sound Card.

-On Windows Machines select ASIO Drivers for high performance DAWs or WDM drivers for consumer audio such as iTunes, VLC, WMP

-Choose number of input and outputs. Up to 64 channels are supported.

-Start Dante Virtual Sound Card

-In Dante Controller assign the necessary audio transmitter channels to the receiver channels of your virtual sound card device.

-Open Pro Tools and select Dante Virtual Sound Card as your hardware interface.

-Select source/destination inputs and outputs for individual tracks.

-Arm all tracks and record. You should see the Dante audio track being recorded into Pro Tools.

Avoiding Disaster with your iLok

I have recently updated this article to reflect updated policies by PACE regarding iLok’s “Zero Dowtime” and loss coverage programs.

What is an iLok?

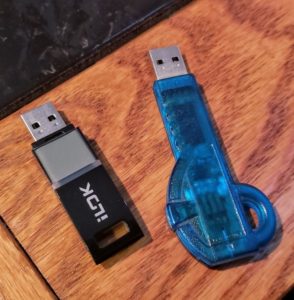
iLok is a physical software authorization key in the form of a USB dongle. Software licenses are placed on the iLok and compatible programs (mostly professional media creation tools) look for the authorization upon startup. This was an early tool to help prevent software piracy.

PACE iLok Generations 1 & 2
PACE iLok Gen 1 & 2

As with most piracy prevention tools it typically hurts the legitimate user more than the pirate. If your software key breaks, then you are out of luck until you can get a replacement shipped to you. PACE, the creators of iLok have done a great job in recent years making sure that customers always have access to their tools and software. There once was a time when a studio could be offline for weeks due to faulty or broken iLok keys, essentially turning production workstations into nothing more than a doorstop. It also use to be a lot harder to get the software manufactures to issue a replacement product key without having to re-purchase software. Thankfully, these are all things of the past.

Replacement

If you find yourself locked out you can be up and running within a few hours if you act quickly. You will need to submit a RMA with PACE for a replacement iLok on their website. The broken iLok will need to be shipped back and they will send you a replacement with loaded licenses. This process can take up to 12 business days due to the shipping process. You will also be required to purchase a new iLok and pay a RMA processing fee.

It’s great that we have the confidence that we get our licenses returned to us but what if you can’t afford to have the studio closed for two weeks? Luckily, the process has been streamlined over the years and if you are willing to shell out the money then you will be up and running in no time. At the time of submitting an RMA you will have the option to join the “Zero Down time” program. This is acts as an insurance policy for your iLok. The cost is $30 per year, per iLok. You will need to join the ZDT program and then additionally pay a $100 expediting fee to get you current broken iLok covered by your new insurance policy. Yes, that s right! Pay $100 and there are no “pre-existing conditions”.

After you have submitted RMA, joined ZTD, and paid the balance, PACE will deposit a 14 day temporary license into your account. This will allow you to authorize whatever software you need to run. A secondary iLok will be required to dump the temporary license onto so its always a good idea to have a spare iLok laying around. There are other ways around this such as using PACE’s software manager to authorize the computer itself but for simplicity sake it’s much easier just to have a spare iLok key in the event of an emergency. This 14 day temporary license will get you buy until you receive your new repaired iLok in the mail. At that time you will just switch back over to your primary iLok. More information on PACE’s zero dowtime program can be found here.

Prevention

There’s no doubt that the recovery process is much easier than it used to be but what can we do to prevent it from happening all together? One of the most common issues i see with broken iLoks is just from basic wear and tear from constantly removing in and out of USB slots. You can see this same type of damage happen with USB flash drives. Although the iLok is build more sturdy than your average thumb drive, it still won’t take much to render it useless.

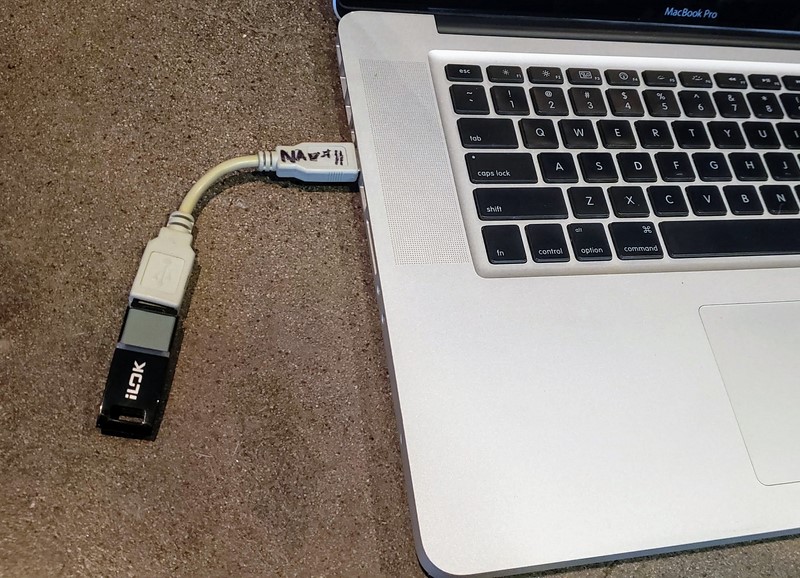
Protect USB devices with a pigtail extension

To prevent dongles such as iLok from breaking I always recommend adding a cheap USB pigtail to your device. A short 6″ USB extension cable can be added so that all the normal wear and tear will be placed on the pigtail rather than the USB drive itself. Having a pigtail also helps on laptops where USB drives are commonly broken off from being stuck in a rigid port. Male to Female extension cables can easily be found and it’s a worthy investment for under $10.

File Systems Formats

File Systems tell computers how to store and retrieve data. It does this by organizing data into different pieces and categorizing for fast retrieval. Different companies such Apple and Microsoft will use different file structures for their operating systems. Some Files systems are built for specific use such as cash registers. Others are built from and resemble standards put in place by the industry. Below is a list of some of the characteristics of the most common files systems found on personal computers. These File Systems are generally used with hard discs, optical storage, and flash media. It is important to understand file system structures especially when using systems and computers that must share data between different structure styles.

NTFS

NTFS (short for New Technology File System) is a modern, well-formed file system that is most commonly used by Windows Vista, 7 & 8. It has feature-rich, yet simple organization that allows it to be used on very large volumes. NTFS has the following properties:

  • NTFS partitions can extend up to 16EB (about 16 million TB).
  • Files stored to NTFS partitions can be as large as the partition.
  • NTFS partitions occasionally become fragmented and should be defragmented often.
  • NTFS partitions can be read from and written to by Windows and Linux systems and, can only be read from by Mac OS X systems (by default). Writing by Mac OS X systems can only be achieved through third party software by use of the NTFS-3G plugin.

It is recommended that NTFS be used for all media whose use is primarily with modern Windows systems. It should not be used for devices which need to be written to by Mac OS X systems or on media that is used in devices which are not compatible with NTFS.

FAT file system

The FAT (short for File Allocation Table) file system is a general purpose file system that is compatible with all major operating systems (Windows, Mac OS X, and Linux/Unix). It has relatively simple technical underpinnings, and was the default file system for all Windows operating systems prior to Windows 2000. Because of its overly simplistic structure, FAT suffers from issues such as over-fragmentation, file corruption, and limits to file names and size. This section refers to the FAT32 file system. Some early versions of Windows 95 used the FAT16 file system, which had even more technical issues and stricter limitations. It is recommended that FAT16 is never used on any modern media. The FAT file system has the following properties:

  • FAT partitions cannot extend beyond 2TB.
    • NOTE: Windows cannot format a disc larger than 32 GB to FAT32, but Mac OS X can.
  • Files stored to a FAT partition cannot exceed larger than 4GB chucks.
  • FAT partitions need to be defragmented often to maintain reasonable performance.
  • FAT partitions larger than 32GB are generally not recommended as that amount of space starts to overwhelm FAT’s overly simplistic organization structure.

FAT is generally only used for devices with small capacity where portability between operating systems is paramount. When choosing a file system for a hard disk, FAT is not recommend unless you are using an older version of Windows.

exFAT file system

The exFAT (Extended File Allocation Table) is a Microsoft file system that is compatible with Windows and Mac OS 10.6+. It is also compatible with many media devices such as TVs and portable media players. exFAT has the following properties:

  • exFAT partitions can extend up extremely large disc sizes. 512 TiB is the recommended maximum.
  • Files up to 16 EiB can be stored on an exFAT partition.
  • exFAT is not compatible with linux/Unix.
  • exFAT partitions should be defragmented often.
  • exFAT cannot pre-allocate disk space.

HFS+ file system

HFS (Hierarchical File System) Plus is a file system developed by Apple for Mac OS X. It is also referred to as Mac OS Extended. HFS Plus has the following properties:

  • Maximum volume is 8 EB (about 8 million TB).
  • Files stored to HFS+ partitions can be as large as the partition.
  • Windows users can read HFS+ but not write.
  • Drivers are available that allow Linux users to read and writer to HFS+ volumes.

EXT file system

The extended file system was created to be used with the Linux kernel. EXT 4 is the most recent version of EXT. Extended file systems have the following properties:

  • EXT4 can support volumes up to 1 EiB.
  • 16 TB maximum file size.
  • Red Hat recommends using XFS (not EXT4) for volumes over 100 TB.
  • EXT4 is backwards compatible with EXT2 and EXT3.
  • EXT4 can pre-allocate disk space.
  • By default, Windows and Mac OS cannot read EXT file systems.

Preparing Files for Multi Studio Use

When traveling around between studios or taking your home recorded project to a professional studio to be mixed or mastered there are a few things that you should consider prior to booking your appointment. You’ll need to make sure your hard drive is compatible with the studio computers and your DAW session file is readable by the studio’s system. Many audio software programs such as ProTools routinely change their file type and the newest format may not be available when you get there. Furthermore, organization is key in a good workflow and if your new engineer has to spend time getting all the files aligned he might lose the vibe of the song or maybe the session altogether. I have also seen countless hours of valuable recording time wasted on re-consolidating files, searching for bounced files, and missing plugins. Here are a few tips to keep your session flowing. If you are also tracking instruments be sure to properly prepare for your recording session.

Call ahead

Call your studio ahead of time to see what the best way to get files to them is. Many recording studios provide a checklist or “todo” list for new clients or for session files that are inbound.

Check Software Version

DAW users may need to save their session as an earlier format. For ProTools this can be done by performing a “Save Copy As” and then choose the version needed. You will only be able to change to the formats supported by your version of ProTools. Make sure you check the “All Audio Files” box.

Sample Rates and Audio Formats

Request the studio’s preferred sample rate. This is more critical with audio for film and television. If necessary you may need to do a conversion of you audio files. Most studios can handle 96K sample rate at 24bit. It is unlikely that a home user would be using something larger than a 48k session but check with you engineer to be certain

Consolidation of Audio Files

If you are using a different DAW than the studio then all audio tracks (regions/clips) need to be
consolidated with no edits and have the same start time (00:00:00). Export these new files as .AIFF or .WAV in the highest resolution possible and then label accordingly. Do NOT make an MP3 of these files and send to your engineer. You should keep these files at highest audio fidelity possible. Consolidating files makes it easy for your studio engineer to drop the entire audio files into a new session. If they all have the same start time everything will line up perfectly.

Preserve Plugins and Effects

If the sound you’re getting from a plugin or effect is vital to the song you should print the
effected audio to another audio track so it can be recreated without the use of the plugin. Check to see what plugins are available at the studio. Some plugins may not load but preserving the finalized audio into a track of it’s own will allow for that sound to always be recalled.

Preserve Virtual Instruments and MIDI Data

Virtual instruments including any audio coming from programs that are rewired such as Reason should also be printed and consolidated to a new audio track. MIDI information for instruments is important to retain in the event that sound replacement needs to be done. It’s also likely the studio will have high quality virtual instruments so maintaining MIDI data from home would be a good idea.

Make a Working Copy “Save As”

Make a copy of the session file for your new engineer to work with. I like to suggest a new session with just consolidated audio and takes that you need to work with. If necessary, your engineer can go back to an older session copy to re-print an instrument or find another take of a track. You also want to make sure you are preserving your file from time to time. Make a copy on a disc and put it in a save place.

Preserve Tempo and Click Tracks

Provide information regarding the BPMs (beats per minute) of all songs if recorded with a click/metronome. Having general notes like this for any song is a good idea. I usually recommend that click tracks are printed to an audio file once the final take of the song is recorded and all timing adjustments are locked in. This ensures a copy of the timing and click are always available in case something goes wrong with the grid or tempo of the session.

Hard Drive Formatting and Transferring

If you plan to work directly off your hard drive be sure to check what file system you should be using. Taking a MAC formatted drive to a PC based studio will not be usable. Also be sure to ask about connectivity for drives. Firewire 400/800, USB 2/3, Thunderbolt are all possible options. Optical media such as CD or DVD discs and USB flash drives are good ways to physically transfer session files but will require being placed onto another hard drive to work from. Your studio may provide a hard drive so it’s best to clarify with them first.

Organize

Make the proper notes for your sessions and songs. The ProTools comment box is a useful tool for making quick tidbits about that specific tracks. I like to include a simple .txt document within my session folder that has basic information such as recording dates, microphones used, external processing, tempo etc. Nowadays I also attach digital photos if I feel necessary. Providing a lyric sheet is very useful for your engineer and producer when recording vocals and mixing.

Deliver Early

Send your files ahead of time if your studio allows it. This will give your producer or engineer a chance to look at the session saving you valuable time later on. Fixing problems before you get to the studio will save you the headache and a ton of cash. There’s a good chance the engineer will not charge you anything just to check things over. After all, it will save them the headache of fixing everything on the day of the session. If your files are a real mess, you might want to budget some time to allow for the organization of your files prior to tracking or mixing your sessions.
5 PowerPoint Shortcuts You Should Know

Hot keys allow us to quickly execute a computer task without having to go through multiple steps to receive the same outcome. A hot key, also known as a shortcut, can be many different combinations of keyboard or mouse strokes pressed at the same time to trigger the paticular command. Most people are already very familiar with shortcut commands like ctrl+c (copy) or ctrl+v (paste) and ctrl+s (save) but I’m surprised how many people do not use these wonderful shortcuts in their every day life. Many of my clients are public speakers who give presentations for a living and I usually try to provide them with these same quick shortcuts to use with PowerPoint. The below shortcuts are for Windows PC only. The Apple Mac equivalents are slightly different but most Mac users will know which key to substitute in the hot-key combination.

  • Ctrl+Z: Undo the last action

  • Ctrl+E: Centers the text in the selected shape

  • F5: Starts presentation from beginning

  • Shift+F5: Starts the presentation from the current  slide

  • B: Blacks the screen (while presenting)

Forcing Direct Downloads with Google Drive

Google Drive is great in all aspects except for the fact that you can’t just email out a direct download link. It’s nice to be able to send files to someone and only have the option for download rather than having it render in the browser.

Most people prefer to use Dropbox or a file transfer site like Hightail, WeTransfer, or DropSend which are all great options but if you’re already utilizing Google’s services doesn’t it make sense to just send a download link directly out of drive? Hopefully this is a feature that Google will someday add to it’s user interface but until then we have a quick solution.

For this to work properly you will need to share the file publicly and allow anyone with the URL to view/access the files. Creating a quick edit of the URL will essentially force the browser to automatically download the files.

The below examples work for files that have no Drive equivalent such as .zip, .mp3, .mp4, and .jpg. All you have to do is make note of the FILE_ID in the original URL and use it in the modified URL.

Force Direct Download from Google Drive share

Typical Drive Share URL:
https://drive.google.com/file/d/FILE_ID/edit?usp=sharing

Direct Link Format:
https://drive.google.com/uc?export=download&id=FILE_ID

Google services such as Docs, Sheets, and Presentations require a slightly different modified URL. Check the quick edits below to force a direct download of those particular file types.

Google Docs

Typical Docs Share URL:
https://docs.google.com/document/d/FILE_ID/edit?usp=sharing

Direct Link Format:
https://docs.google.com/document/d/FILE_ID/export?format=doc (to download Word file) https://docs.google.com/document/d/FILE_ID/export?format=pdf (to download PDF)

Google Sheets

Typical Sheets Share URL:
https://docs.google.com/spreadsheets/d/FILE_ID/edit?usp=sharing

Direct Link Format:
https://docs.google.com/spreadsheets/d/FILE_ID/export?format=xlsx (to download Excel file) https://docs.google.com/spreadsheets/d/FILE_ID/export?format=pdf (to download as PDF)

Google Presentations

Typical Presentations Share URL:
https://docs.google.com/presentation/d/FILE_ID/edit?usp=sharing

Direct Link Format:
https://docs.google.com/presentation/d/FILE_ID/export/pptx (to download PowerPoint) https://docs.google.com/presentation/d/FILE_ID/export/pdf (to download PDF)

GMail for the Outlook Lover

Google is a powerhouse when it comes to email services and Outlook has been a business staple since the beginning of time. Google’s mail services are a popular choice with virtually unlimited online cloud storage, lighting fast speed and reliability. Many IT departments are letting Google handle their email servers all together and noone is blaming them. It’s a good choice and helps clear up those old office closets that hold the office email servers. Web interfaces are also now the norm. That means that you can directly check your mail through a browser rather than in a “mailbox” program such as Outlook, Thunderbird, or MacMail.

Although you can set Outlook to fetch and send mail using Google servers you may find a benefit to using the web user interface. After-all, that’s what it’s built and designed for.

Google Labs offers great features

You’ll find advanced features, sorting and organizational options that Microsoft could never offer you in Outlook products. The Google GMail web interface is also free to use so no more shelling out the big dollars for expensive Outlook software. Some of my clients have grown up using Outlook for 15+ years and GMail tends to be a little foreign and confusing. Just like everything, it will take time but after you learn the interface you will be glad you did. I routinely get asked if there is a way to make the web interface of GMail feel more like Outlook. The short answer is “Yes!” but only on a limited scale. If you truly cannot give up that Outlook operation style and fear learning something new then staying with Outlook or similar mail program is your best bet.

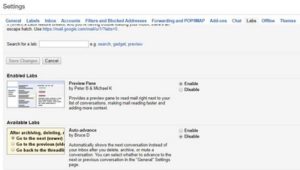
To make your transition from Outlook to Gmail as seamless as possible you can enable a few features in your settings that will make your inbox look a little more like Outlook. All setting can be adjusted by going to the gear icon in the upper right corner and then by selecting “settings” in the drop down menu.

ENABLE PREVIEW PANE

  1. Open Settings and select the Labs tab at the top
  2. Search for Preview and the Preview Pane lab will appear
  3. Check the Enable box & click on Save changes
  4. Return to your inbox, a Split Pane button can be seen at the top.
  5. Select the Vertical Split option from the drop-down menu.

Click on any email in the list and you’ll see it previewed in the side pane just like in Outlook.

DISABLE CONVERSATION VIEW

Gmail groups messages together by default based on the subject line. If you have used the newest Outlook then you might have some experience with this view, but most old school users find this feature annoying and would rather turn it off.

  1. Go to Settings
  2. Scroll down to the Conversation View and check Conversation view off
  3. Click on Save changes

ENABLE GOOGLE CALENDAR GADGET

  1. Open Settings and navigate to the Labs tab
  2. Search for Calendar and the Google Calendar gadget will appear
  3. Enable it and Save changes

RETURN SETTINGS TO DEFAULT

If you want to revert back to the default Gmail look go: Settings>Labs>Disable Preview Pane>Save changes

Backup Your WordPress Site

It’s important to backup your wordpress site on a routine basis. Sometime files become corrupted, infected with virus, or accidentally deleted. There are plenty of plugins that can make these tasks easy but I feel like it’s important to know how to do this if those tools aren’t available. Below I’m going to cover the steps required to backup your word press site manually.

When backing up your wordpress site there are basically two areas that we need to focus on. The two areas are the Site Files and the MySQL database. Both section together encompass your entire website and a full backup can restore you website completely. Within the site files there are several different components that may be backed up independently, although I always recommend doing a full backup of files at the root of your site in the public_html directory.  There are many reasons for why one would want to just backup certain sections of the site. Web developers commonly backup only the needed areas to keep backup sizes small. For simplicity sake I always backup the entire site so you have more than enough to work with in case a recovery is needed. Lets take a look at what is contained within the “Site Files“.


Site Files

Core WordPress Files -These files are the backbone of every wordpress site and are essentially the foundation blocks of you website. They are the coding structure of the way everything runs. These files generally never change and a fresh copy can always be downloaded at www.wordpress.org.

WP-Content Folder – This folder is where wordpress stores all of your images, media, uploads, theme files and other critical files that are unique to your site. Plugins are also contained within this folder. Sometime a plugin might be causing an issue with a site and there would be reason to exclude files from your backup or restore.

Configuration files – These are important files that contain settings information. They  tell your website how to load and where to find your files. Some of the more important are your “wp-config.php” and you “.htaccess” files.

MySQL Database

Your WordPress Database is stored in a MySQL file and contains all your pages, posts, comments, and user data. You can think of this as most of the text data that you enter into your site. It is the data that is updated most frequently and therefore should be backed up more frequently than your site files.


Backup Procedure

Site Files

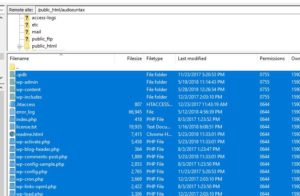
The best method to backup your site files is to use an FTP client such as FileZilla. You can also download the files directly from your host site or server where your files are stored. When downloading the files, remember that it is best practice to just grab all of the files on your server. These can then be saved to a USB flash or external harddrive. Login to the FTP client using instructions supplied by your host. Navigate to the root of your site usually contained within the “public_html” folder. You will see a list of files and folders including WP-Content, wp-config.php and others as previously discussed. Make sure you highlight all the files and then drag them to your desktop. This process of downloading can take some time. If you have a lot of pictures and media rich pages than this could take anywhere from a few minutes to a few hours. After you have your files downloaded, back them up to external hard disks or optical media such as burnable DVD’s. Checkout my post on Quick and Safe Data Transfers to learn how to more efficiently backup data of all types including your website and multimeda project files.
WordPress Database Backup

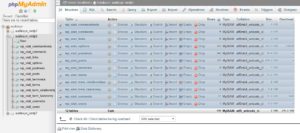
There are many methods to backup your database including using your hosts’s control panel, a popular platform called cPanel or by the use of backup plugins. I suggest doing it from directly within phpMyAdmin which is a program that will be running on your web host. We can usually log into it at your web host provider such as GoDaddy or HostGator and find it under the database sections. Downloading the database will render a small SQL document which will look like a text or notepad file. It contains very important code which will include all of your pages, posts, comments, and user data. It is recommended that you backup this file at least once a month or more frequently if you consistently update your site.
  1. Log into phpMyAdmin on your server
  2. From left side window, select your WordPress database. In this example, the name of database is “wp”.
  3. The right side window will show you all the tables inside your WordPress database.
    Click the ‘Export’ tab on the top set of tabs.
  4. Ensure that the Quick option is selected, and click ‘Go’ and you should be prompted for a file to download. Save the file to your computer.
  5. Keep the .sql databse in a safe place along with your site files.

that’s It! Your website is now completely backed up. Make copies of these files and store them on external hard disks or optical media such as burnable DVD’s. Checkout my post on Quick and Safe Data Transfers to learn how to more efficiently backup data of all types including your website and multimeda project files.


Fix Pro Tools Issues by Trashing Preferences

Sometimes ProTools session just won’t open or if they do, they don’t function properly. This is primarily visible in systems that deal with session files from a variety of sources such as professional recording studios. Recording artists will routinely bring in previously recorded material from a variety of studios all using different version of ProTools. Most the time sessions will open without issue but only have annoying features such as the size and function of windows, transport placement, and UI settings. If you find yourself with a crashing system and a paying client it’s a good idea to purge your application preferences first to see if that will solve your issue. Trashing the Pro Tools preferences is easy and is a good way to reset the ProTools software to it’s default state. You can find steps on Avid’s site for all the versions of ProTools for both Windows and Mac.

Mac

Pro Tools 11 & 12

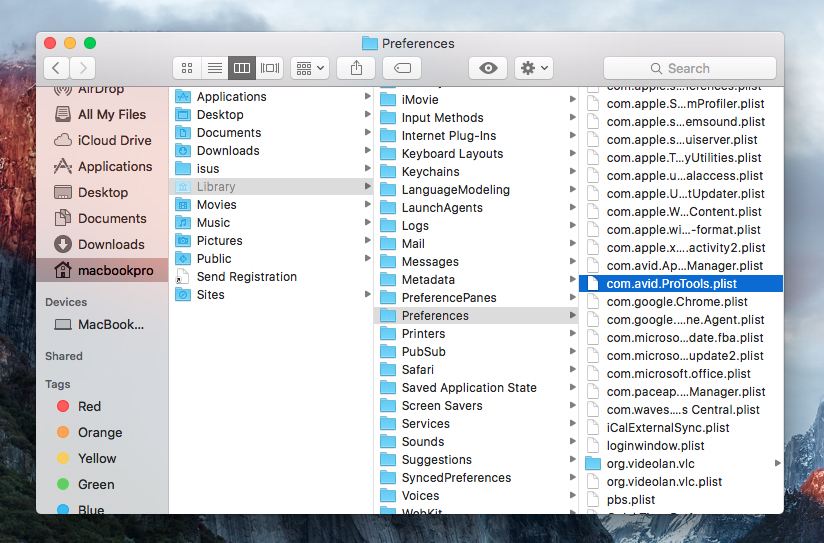
1. With Finder as the active application, click on the Go menu, hold the Option key and click Library.

2. Click on the Preferences folder and delete the following items:

  • Preferences > Avid > Pro Tools
  • com.avid.ProTools.plist 

ProTools Preferences Location in OSX

3. Open the Trash, click Empty, then Empty Trash. Once done, restart your computer.


Windows

Pro Tools 11 & 12

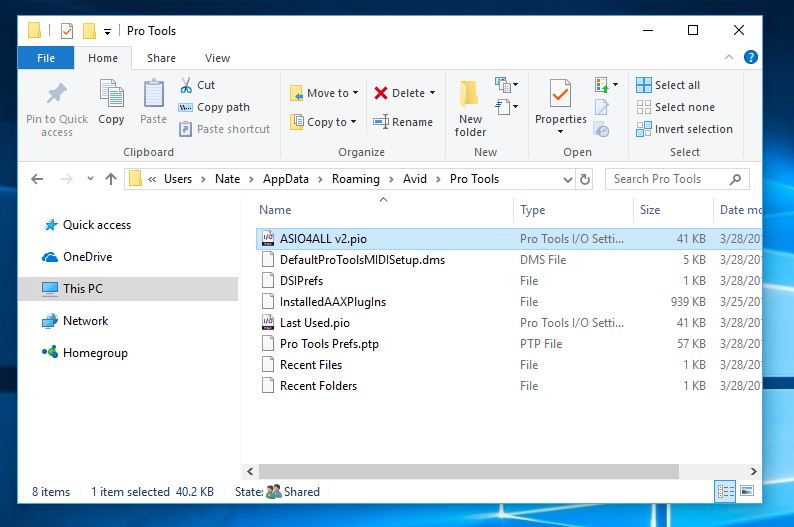
  • Go to C:Users > *Your User Name* > AppData > Roaming > Avid and delete the Pro Tools folder. Then, restart your computer.
    • NoteIf you cannot find the AppData folder, click on the View tab, above Show/hide check Hidden Items

ProTools Preferences Location in Windows 10

ProTools Preferences Location in Windows 10

Quick and Safe Data Transfers

File backup is a must nowadays. Sometimes I find myself transferring gigabytes of data between different hard drives and folder locations. I’m going to cover some of tools I like to use when transferring large amounts of data from one location to another. This is a different process than hard drive cloning which I’ll cover later in a separate post. Transferring files is the process of dragging and dropping or copying and pasting from one location to another within your operating system environment.

When it comes to transferring multiple files in Windows, the built-in file copying feature can at times be unreliable by missing a corrupting data. In fact, the tool is pretty much worthless if you need to copy anything over 2GB and should be avoided at all costs if intend on making functional backups. Microsoft has a excellent rather unkown alternative that runs from the command line called “Robocopy,” which is short for “robust copy”. Robocopy is built into the Windows file system and can recover from data faults and copy interruptions. The downside is that it runs completely in command line and is not very user friendly to your everyday computer user.

I have used Robocopy for years but recently discovered a nice alternative called TeraCopy. I have heard of this program before but never really gave it a shot. I was always scared away by its paid version but I must say that the free version is a great tool. This integrates with Windows Explorer’s right-click menu and can be set as the default for copying files. It skips over bad files instead of terminating the whole transfer like the built-in copier functions. It can also run checksums after it’s done to check for errors.

Robust file copying for Windows

For Apple device I have never really needed a robust file copier. Apple systems seem to be built better at the root which has never really showed issues with file transfers. There are plenty of options out there such as XFile and UltrraCopier.