Pro Tools Playback Engine

Pro Tools Playback Engine
Pro Tools Playback Engine window

Small tweaks in Pro Tools playback engine can go a long way and help your system run smoother based on your current task. Incorrect settings in the playback engine can also cause errors and crashing during the recording or mixing process. So what setting should you be using? The answer is based on what you are trying to accomplish with your DAW. So, let’s look at the basic principles of buffer speeds and optimization to help you make a decision on what’s right for your situation.

Lower Buffer

Lowering your buffer speed while recording and tracking will help reduce audible latency. The downside of this is that you will be putting more strain on your computer’s CPU and will not be able to run many plugins. In general, it’s best practice to use minimal light-weight plugins to reduce processing requirements while tracking. Plugins can always be changed in the mix phase to a better sounding, more power hungry processor. If you are asking too much of your computer’s processor then you will get audible clicks and pops and possible even recording failure during the tracking process. Try out each setting and see what works best for your current situation. On Pro Tools LE rigs I typically don’t need to go any lower than 256 samples while multi-track recording 24 channels of audio.

Higher Buffer

Setting your buffer to the highest setting while monitoring playback and mixing will allow you to run more plugins and signal processing. There will now be slight delay when you start playback but this is a normal symptom of using a high buffer setting. The slight latency should not affect you in the mixing process but is obviously very hard to work with if you are recording instruments and have any intention for timing or rythym.

Change your Playback Engine settings in Pro Tools

  1. Click on the Setup menu at the top of your screen.
  2. Choose Playback Engine.
  3. In the buffer speed drop-down, select the speed that best fits your situation

Note: Choose a lower setting for tracking or a higher setting for mixing performance.

Preparing Files for Multi Studio Use

When traveling around between studios or taking your home recorded project to a professional studio to be mixed or mastered there are a few things that you should consider prior to booking your appointment. You’ll need to make sure your hard drive is compatible with the studio computers and your DAW session file is readable by the studio’s system. Many audio software programs such as ProTools routinely change their file type and the newest format may not be available when you get there. Furthermore, organization is key in a good workflow and if your new engineer has to spend time getting all the files aligned he might lose the vibe of the song or maybe the session altogether. I have also seen countless hours of valuable recording time wasted on re-consolidating files, searching for bounced files, and missing plugins. Here are a few tips to keep your session flowing. If you are also tracking instruments be sure to properly prepare for your recording session.

Call ahead

Call your studio ahead of time to see what the best way to get files to them is. Many recording studios provide a checklist or “todo” list for new clients or for session files that are inbound.

Check Software Version

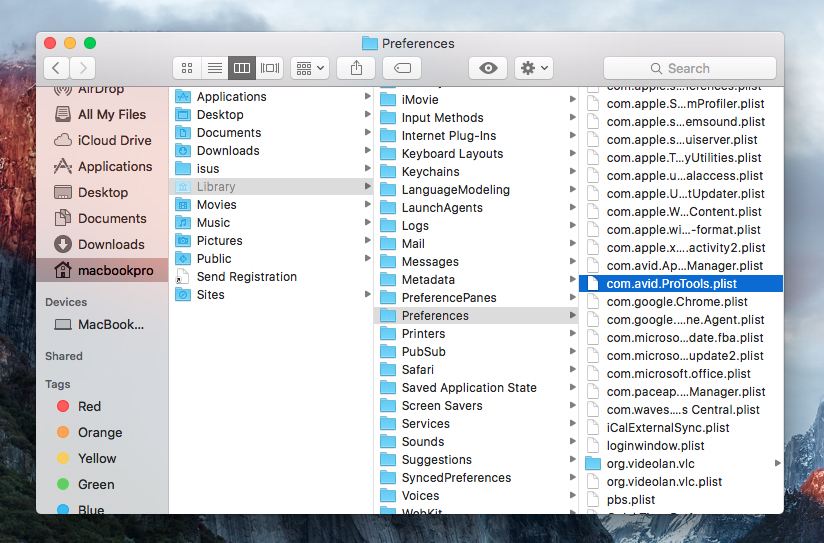
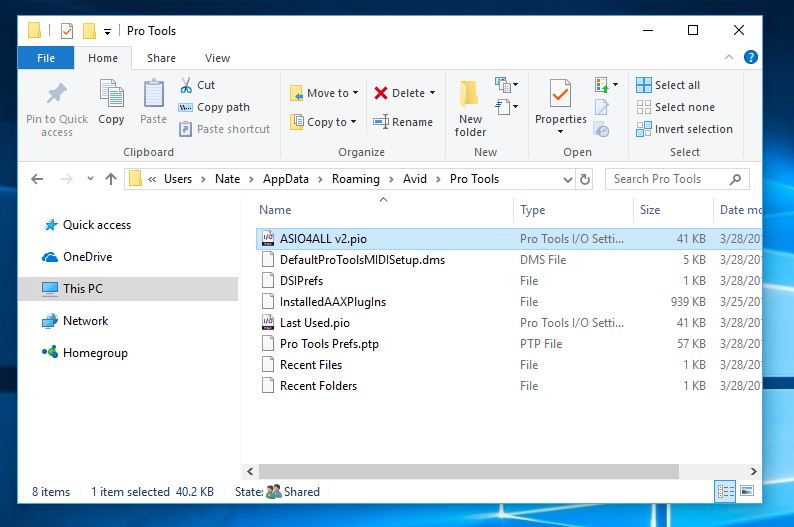
DAW users may need to save their session as an earlier format. For ProTools this can be done by performing a “Save Copy As” and then choose the version needed. You will only be able to change to the formats supported by your version of ProTools. Make sure you check the “All Audio Files” box.

Sample Rates and Audio Formats

Request the studio’s preferred sample rate. This is more critical with audio for film and television. If necessary you may need to do a conversion of you audio files. Most studios can handle 96K sample rate at 24bit. It is unlikely that a home user would be using something larger than a 48k session but check with you engineer to be certain

Consolidation of Audio Files

If you are using a different DAW than the studio then all audio tracks (regions/clips) need to be
consolidated with no edits and have the same start time (00:00:00). Export these new files as .AIFF or .WAV in the highest resolution possible and then label accordingly. Do NOT make an MP3 of these files and send to your engineer. You should keep these files at highest audio fidelity possible. Consolidating files makes it easy for your studio engineer to drop the entire audio files into a new session. If they all have the same start time everything will line up perfectly.

Preserve Plugins and Effects

If the sound you’re getting from a plugin or effect is vital to the song you should print the
effected audio to another audio track so it can be recreated without the use of the plugin. Check to see what plugins are available at the studio. Some plugins may not load but preserving the finalized audio into a track of it’s own will allow for that sound to always be recalled.

Preserve Virtual Instruments and MIDI Data

Virtual instruments including any audio coming from programs that are rewired such as Reason should also be printed and consolidated to a new audio track. MIDI information for instruments is important to retain in the event that sound replacement needs to be done. It’s also likely the studio will have high quality virtual instruments so maintaining MIDI data from home would be a good idea.

Make a Working Copy “Save As”

Make a copy of the session file for your new engineer to work with. I like to suggest a new session with just consolidated audio and takes that you need to work with. If necessary, your engineer can go back to an older session copy to re-print an instrument or find another take of a track. You also want to make sure you are preserving your file from time to time. Make a copy on a disc and put it in a save place.

Preserve Tempo and Click Tracks

Provide information regarding the BPMs (beats per minute) of all songs if recorded with a click/metronome. Having general notes like this for any song is a good idea. I usually recommend that click tracks are printed to an audio file once the final take of the song is recorded and all timing adjustments are locked in. This ensures a copy of the timing and click are always available in case something goes wrong with the grid or tempo of the session.

Hard Drive Formatting and Transferring

If you plan to work directly off your hard drive be sure to check what file system you should be using. Taking a MAC formatted drive to a PC based studio will not be usable. Also be sure to ask about connectivity for drives. Firewire 400/800, USB 2/3, Thunderbolt are all possible options. Optical media such as CD or DVD discs and USB flash drives are good ways to physically transfer session files but will require being placed onto another hard drive to work from. Your studio may provide a hard drive so it’s best to clarify with them first.

Organize

Make the proper notes for your sessions and songs. The ProTools comment box is a useful tool for making quick tidbits about that specific tracks. I like to include a simple .txt document within my session folder that has basic information such as recording dates, microphones used, external processing, tempo etc. Nowadays I also attach digital photos if I feel necessary. Providing a lyric sheet is very useful for your engineer and producer when recording vocals and mixing.

Deliver Early

Send your files ahead of time if your studio allows it. This will give your producer or engineer a chance to look at the session saving you valuable time later on. Fixing problems before you get to the studio will save you the headache and a ton of cash. There’s a good chance the engineer will not charge you anything just to check things over. After all, it will save them the headache of fixing everything on the day of the session. If your files are a real mess, you might want to budget some time to allow for the organization of your files prior to tracking or mixing your sessions.

What is “Squelch” on my Wireless Mic?

I’ve had several people ask me recently about squelch on their wireless mics. Squelch is an important factor in radio transmission and must be utilized correctly if you intend to use wireless mics in a sound system. Wireless mics are highly susceptible to interference from other radio transmissions and setting the proper squelch is just as important as ensuring your frequencies match on your transmitter and receiver.

Squelch means to “to completely suppress”. Its function is to mute the audio output of the receiver when the radio signal falls out of an acceptable range. Without a signal to “latch” onto the open receiver may pick up another signal or radio noise from somewhere else. This is typically heard as “white” noise and is often much louder than the audio signal from the desired frequency. As you can imagine, we don’t want to hear unexpected white noise over any loud PA system. HAM and CB radio operators are familiar with adjusting their squelch on their radio receivers to ensure clear communication and to prevent the same white noise from playing back through their receiver.

We can easily adjust the squelch on wireless mics with just a few steps. Most setting can be adjusted in the main menu or the near the same menu as the frequency settings. In some cases the squelch might be a physical knob which can be found on the back of the wireless receiver unit. Check with your owners manual or manufacturer for specific steps regarding your wireless unit.

Shure provides these steps for their wireless systems.

  1. Set the receiver volume control to minimum to avoid excessive noise in the sound system.
  2. Turn the receiver power on.
  3. Observe the RF and audio indicators on the receiver.
  4. If the indicators are showing a no-signal condition the squelch setting may be left as-is.
  5. If the indicators are showing a steady or intermittent signal-received condition increase the squelch control setting until a no-signal condition is indicated. Set the squelch control slightly past this point to provide a threshold margin.
  6. If the no-signal condition cannot be achieved even with high squelch settings it may be possible to find and eliminate the undesirable signal. Otherwise it may be necessary to select a different operating frequency.
  7. Turn the transmitter power on.
  8. Make sure that the receiver indicates a signal-received condition with the transmitter at normal operating distance.

Should Bluetooth 5.0 Have Engineers Excited?

Bluetooth 5.0 is the latest version of the wireless communication technology and it’s got some exciting new features. We haven’t seen this big of an improvement on the technology since version 4.2 released in 2015. The PAN (personal area network) communication technique still operates on the 2.4 GHz to 2.483-GHz spectrum, but uses 40 2-MHz-wide channels rather than the 79 1-MHz channels of classic Bluetooth. This essentially gives us lower power consumption and greater interference mitigation. That’s good news for those of us that use wireless headphones or speakers and plan our days around battery consumption. Bluetooth 5.0 will also give us the option of pairing multiple devices together at the same time. The biggest advantage to this is having multiple pairs of headphones connected to the same phone or audio device. Sorry, playing content in separate rooms like a Sonos system won’t be possible. This is still a peer-to-peer network and it’s just not built for that. Even with all the great eco-friendly feature introduced in the new standard I’m primarily excited about 2 things, speed and range.

The technology now supports speeds up to 2 Mbps which is nearly twice as fast as its predecessor. For audio enthusiasts this means high bit-rate audio at lossless quality. We are sure to see great improvements is in the home theater sector where we can now feed high fidelity audio out our wireless entertainment systems. Home theater component and 7.1 surround systems have been lacking for years due to having to sacrifice quality for the ease of wireless transmission. This is still not fast enough to comfortably support live performance or studio applications such as in-ear monitors or audio hardware where engineers rely on zero latency. However, quality wireless transmission of multi channel audio with zero latency is not too far away. Obviously this is great if you rely on Bluetooth solely for data transferring. Sending wirelessly between computers or from your camera to laptop can now be accomplished in half the time.

Bluetooth 5.0 also supports nearly 4 times the transmission distance bringing in a whopping 260 feet of wireless communication (line of sight with no interference of course). That’s a huge improvement over the 30 feet maximum we get out of Bluetooth version 4.2. This will be good for headphones and outdoor spaces where you can have your speakers a long distance away from your source player or phone. We’ll also start to see small conference rooms, classrooms, and whole house audio systems operating on the personal area network platform. In the engineer world we will start to see controller devices such as phones and tablets start utilizing audio control systems and mixers over Bluetooth rather than traditional WIFI.

We’re really truly at the mercy of the manufactures here to see what they can make of this newest technology and how it will relate in the live performance and studio environments. Smart home and IoT devices such as light bulbs and thermostats are sure to switch over to Bluetooth which will help clean up the over crowded WIFI spectrum. However, I’m skeptical that the audio industry will truly utilize the benefits of Bluetooth 5.0 to improve on hi-fidelity transmission. It appears this standard is really focused at the IoT industry and the consumer headphone market where audio quality doesn’t even exist. This new standard is all about transmitting data faster at lower power with greater connectivity. The Special Interest Group that founded Bluetooth didn’t even mention anything about audio quality when they announced the new standards late last year. Music and audio lovers will still reap benefits from the technology advances in the newest version.

Although the standard is already in place, it will likely take several years for the industry to fully implement the latest version to your favorite headphones, cameras, and computers. We can expect to see almost all devices using version 5.0 as a standard by year 2020. One thing that’s for sure is our wireless atmosphere is about to become busier than ever.

What does XLR mean?

A colleague of mine asked the other day what the acronym XLR stood for. We are both seasoned engineers with years of experience and I have probably plugged/unplugged at least one XLR cable every day of my life for the past 17 years. I was stumped. The last time I had even thought about it was maybe in college on some test or something but I did remember that it was an interesting story and there was no particular correlation between audio terminology and X-L-R. I had to rush home to the books to look it up and refresh my memory.

Today’s standard XLR connection

The term XLR is nothing more than the prefix of the product number for the Cannon cable connectors invented back in the 1950’s. The rarely used “X” series of cable connectors became

popular when Cannon added the latch mechanism that locked male and female plugs together hence the addition of the “L” in the product prefix. Later modifications to the design added Resilient plastic surrounding the female contacts for durability and the term “XLR” was born.

However it took nearly 2 decades for the design to become standard operation worldwide for both engineers and manufacturers. Many other renditions of the 3-pin connector were still popular throughout the 60’s and 70’s including “P” style and “UA” connections used by companies such as RCA and Neumann. Companies such as Switchcraft and Neutrik later started mass producing these connections and it finally stuck as an industry standard.

A couple other things that I find interesting is that the XL series established Pin 1 as shield/ground and also made the female Pin 1 slightly forward in it’s shell so that it would always make connection first and break last. It’s amazing how many renditions of connectors the industry had gone through to finally find a standard that worked.

Wireless Spectrum Reallocation

As you may have already heard The US government as yet again authorized the Federal Communications Commission to auction off a portion of the wireless spectrum (TV bands) to make those frequencies available for future wireless broadband and cell phone usage. These frequencies are where many professional wireless mics and in-ear monitor systems have been operating for years. So what does this auction mean to you, the wireless audio gear user? I have compiled a short list of resources regarding the issue.

It’s only been 6 years since we had to deal with the auctioning off of the 700MHz band. Now the 600MHz band has been listed as the next to go. We are seeing a high demand for these frequencies to be utilized in other areas of technology such as radio communications for emergency responce although the largest reason is likely because of the popularity of cellphones. You can bet that 500MHz will be affected sometime in the unforeseeable future so plan accordingly.

There’s a good chance that if you have purchased a system within the past few years you are safe with a 900MHz or one of those that are not currently affected. From my experience, integrated AV 
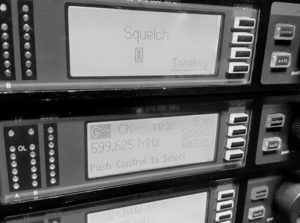
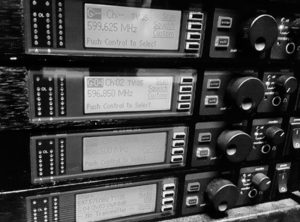
systems and sound systems that were installed by a contractor tend to have affected equipment even if it was installed after the FCC’s announcement. This is likely due to supply houses and contractors trying to unload inventory before they themselves end up with nothing much more than an expensive paper weight. I saw this with the 700MHz reallocation a few years ago and am seeing it again now. Make sure to check you wireless frequencies and budget to replace if needed. Luckily the 3 largest manufactures offer trade-in rebates on affected wireless systems. You must have proof of purchase and file for the trade-in rebate before the deadline. Sennheiser’s deadline is June 30th, 2018 and Shure’s deadline is July 30th, 2018. Audio Technica’s deadline for rebate is set for sometime in 2019. You can refer to each manufacturer on trade-in specifics and how to collect your rebate.

The affected frequency bands are 616–653MHz and 663–698MHz. Wireless systems that operate within these frequencies will need to be replaced before the end of 2018. The exact change over date is a little confusing and each region in the country is operating on it’s own timeline. If you are a touring musician or travel with wireless equipment then you’ll need to know that each state is set to go into affect at different times. It’s safe to say that you should replace your system before the end of 2018 in most parts of the country. The FCC’s auction concluded on March 27,2017 and was given a 39 month transition window before the frequencies are reallocated for different use. All transitions are expected to be completed by 2020. I live in the mid-west and don’t travel much outside of these boundaries so I really only care about this region. Indianapolis, Chicago, and Nashville are part of Phase 6 of the transition and is set to conclude on October 18, 2019. By comparison Las Vegas is set to conclude transition on November 30th, 2018. July 13, 2020 is the final day of the transition. After this date you cannot legally operate a wireless device in the 616–653MHz and 663–698MHz band.


Fix Pro Tools Issues by Trashing Preferences

Sometimes ProTools session just won’t open or if they do, they don’t function properly. This is primarily visible in systems that deal with session files from a variety of sources such as professional recording studios. Recording artists will routinely bring in previously recorded material from a variety of studios all using different version of ProTools. Most the time sessions will open without issue but only have annoying features such as the size and function of windows, transport placement, and UI settings. If you find yourself with a crashing system and a paying client it’s a good idea to purge your application preferences first to see if that will solve your issue. Trashing the Pro Tools preferences is easy and is a good way to reset the ProTools software to it’s default state. You can find steps on Avid’s site for all the versions of ProTools for both Windows and Mac.

Mac

Pro Tools 11 & 12

1. With Finder as the active application, click on the Go menu, hold the Option key and click Library.

2. Click on the Preferences folder and delete the following items:

  • Preferences > Avid > Pro Tools
  • com.avid.ProTools.plist 

ProTools Preferences Location in OSX

3. Open the Trash, click Empty, then Empty Trash. Once done, restart your computer.


Windows

Pro Tools 11 & 12

  • Go to C:Users > *Your User Name* > AppData > Roaming > Avid and delete the Pro Tools folder. Then, restart your computer.
    • NoteIf you cannot find the AppData folder, click on the View tab, above Show/hide check Hidden Items

ProTools Preferences Location in Windows 10

ProTools Preferences Location in Windows 10

Audio Over IP Basics

Audio over IP is nothing more than audio that is being sent over the internet. The digital audio file is encapsulated in a packet and it’s data is sent over the web just like a picture or an email. The end user is usually using a similar system which decodes the packet and plays back the audio in near real time. You might use this technology every day using FaceTime or Skype.

Audio over IP networks (AOIP) are nothing new but we are finally starting to see some major improvements with these distribution mediums. The technology replaced aging ISDN networks which were used many years prior by studios and radio stations. The infrastructure usually consisted of multiple telephone lines to create a high bandwidth network. The cost for hardware and service was atrocious. Both systems are capable of providing high quality audio with very little latency. Depending on the codec and the system being used it possible to get near original quality of a singer in Boston played back in real time to an engineer in Mumbai. Think of a very high qaulity phone call suitable for recording or broadcasting.

AOIP and VOIP technologies are steadily growing more reliable so it’s only a matter of time before manufactures start pushing these technologies as the standard to consumer markets. The major factors of audio over IP is quality and latency. Keep in mind that AOIP when used in live events, broadcast, and studio is far different than listening to your favorite artist over Spotify. Live engineers depend on near zero latency and high bandwidth which means buffering is not an option. Even when used in video conferencing it is incredibly annoying when the call is dropping in and out or there is a huge delay.

We’re still a long ways away from determining one standard that we will see as default in hardware including mixers, cameras, phones, conferencing systems and studios. The industry is still currenly dominated by a proprietary market where hardware manufactures usually require their technology be used on both ends of the transaction.

Hearing Assist in Sound Systems

You’ll find a hearing assist system in almost any venue nowadays and quality and ease of use vary by style. Hearing assistance in public address systems are a must and it’s important to understand the different types of setups you might encounter.

Hearing assist systems are usually a separate piece of hardware that is separate from the mixer or amplifiers. It can be fed with the same mix as the amplifiers or a completely dedicated mix which can be compressed and EQ’d for optimal clarity. Hearing system mixes should include not only the microphones present in the room but also any computer playback and teleconference audio that migh be used. Let’s review the different types of hearing assist systems currently available.

Receivers – Included with all systems and customized to pickup whatever audio delivery method the venue uses. Devices are usually handed out to users upon request and range in size from a credit card to a necklace or lanyard worn by the individual. Receivers will include a 3.5mm audio jack for any earbuds or dongles for integration with hearing aids.

RF (Radio Frequency) – Same technology as a two-way radio or baby monitor and has been dependable for years. The system uses a small transmitter with antennas to transmit RF signals to receiver devices given to the end users. RF systems are generally the cheapest but systems range in price depending on the features. Some venues transmit multiple channels of RF for different languages or different rooms and this can easily be accomplished. Common frequencies found can be 2.4GHz, 5Ghz, and 72MHz just like wireless microphones and IEM systems.

IR (Infrared) – Same concept as RF only uses IR radiators to flood infrared light into a space for receivers worn by the user. It has better security than RF because the infrared can be contained to one room and cannot leak through walls. Each room in facility will need it’s own IR radiator and cabling which can add to cost.

Induction Loop (T-Coil)  – Hearing Loop in the newest technology and uses a magnetic field from the building to transmit audio to a receiver or T-Coil compatible hearing aid. These systems use copper wire installed in the floor much like a heated flooring system and can span an entire venue. For obvious reasons this is usually only done for new construction or remodel and can also be the most expensive. T-Coil ready hearing aids are becoming more popular and users prefer the ability to connect to a system without any additional hardware. Induction technology seems to be the favorite as long as a well calibrated system is in place.  

Things To Do Before Your Recording Session

Here is a quick list of things musicians can do before arriving at a studio session. Performing these tasks before you begin recording can save you valuable time and headaches in the studio. This is a list I compiled after seeing the same problems repeated over and over again. Although most of these apply to the recording studio, you may find that these are useful for live gigs as well. If you are headed to the studio and are bringing your own hard drive or files you should read this separate list specifically for transferring recording sessions between locations.

  • Put new strings on your guitar or bass a day or two prior to the recording session. Drummers are recommended to use new heads for recording session. Make sure you play with them for awhile to “break-in” the sound and ensure your are familiar with the new feel.
  • Guitar and bass players – bring a tuner. Drummers – bring a drum key. I have seen an hour wasted as a single tuner makes its way around the room. By the time it gets to the bass player, guitar lead #1 is already back out of tune. Each musician should have their own tuner.
  • Make sure all your equipment (amps, guitars, pedals, cords, drums, etc.) is in proper
    working order before the session begins. If you are getting a hum from your amp, squeak
    from your bass drum pedal, or your guitar cord has a short in it please get your gear fixed
    beforehand!
  • Bring extra batteries for your guitar/bass pedals and active instruments. Bring extra
    sets of strings, picks, and drum sticks. Most recording studios will have this stuff on hand but the price really adds up! 9-volt batteries and extra cables are a must for any musician gig bag.
  • Don’t forget your guitar and keyboard stands. Also, any power supplies for
    keyboards, guitar and bass FX processors.
  • Arrive to the studio early and account for load-in time. this will differ between studios and how they accurately bill for a session so talk to them first. At most studio the clock starts at the time the session was scheduled/booked so arriving early will give you time to set up your instruments and warm up your vocals. In cold or humid climate you should let your instruments acclimate to the studio environment
  • It is recommended to have your guitar or bass guitar’s intonation set up and general
    maintenance performed by a professional before entering the studio. This is just routine maintenance and to keep your instrument in top shape you should have it inspected annually.